The Salamba sirsasana 2 (salamba- supported, sirs-head, asana- posture), is also called the tripod handstand (three points of support, 2 hands, and head).
This is another of the common headstands often practiced in yoga classes. This headstand also comes in the Ashtanga vinyasa advanced series as a transition between various arm balancing postures.
The tripod headstand requires a stronger neck, arms, shoulder, and core compared to the basic headstand. There is more load on the neck so try to understand the alignment of the posture properly before trying it.
Some people might find the tripod headstand easier than the basic headstand. The salamba sirsasana 1 (basic headstand) requires some shoulder flexibility to get into it which the tripod headstand doesn’t. So if you have a strong neck and strong upper body you might be able to do this posture more easily than the basic headstand.
Headstands can be sometimes scary because we are not used to the upside-down position. Here we will help you get over that fear by giving lots of progressions for this pose. Keep trying one of the progression for some time and once you feel confident you can move on to the next one. Take your time, give yourself small targets and understand the pose properly in the process.
Progressions
- Learn to activate the neck and shoulder muscles in the standing position– Stand with your foot hips-width apart, roll your shoulder up and then back, open your chest and move the shoulder blades down towards your hips, at the same time try to keep the shoulder blades as far apart as possible. Imagine you are pushing something up with the top of your head. Take a moment here and observe how the muscles are engaged. In the actual tripod headstand, the muscles will be engaged in a similar fashion.
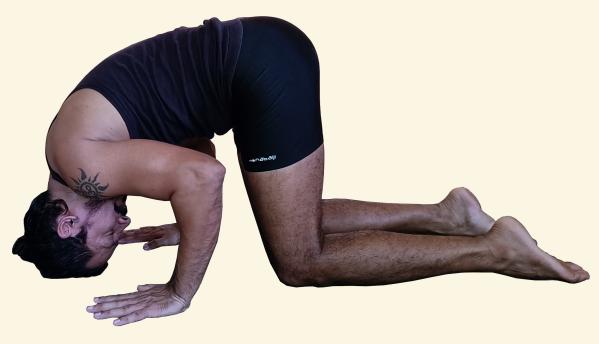
- Getting used to the upside-down position– Place your hands about shoulder-width apart and place the crown (top) of the head at such a point so that it makes an equilateral triangle with the hands. Keep the arms parallel to each other and the palms are pressing the floor (the tendency of the elbow is to move out, so be aware to keep the arms parallel to each other). Engage the shoulder blades and push them towards your hips, at the same time press the crown of the head onto the floor to create more space in between the 7 cervical vertebrae. Stay here and observe if you are engaging the muscles properly. Do small adjustments with awareness which helps you to decrease the compression of the joints.

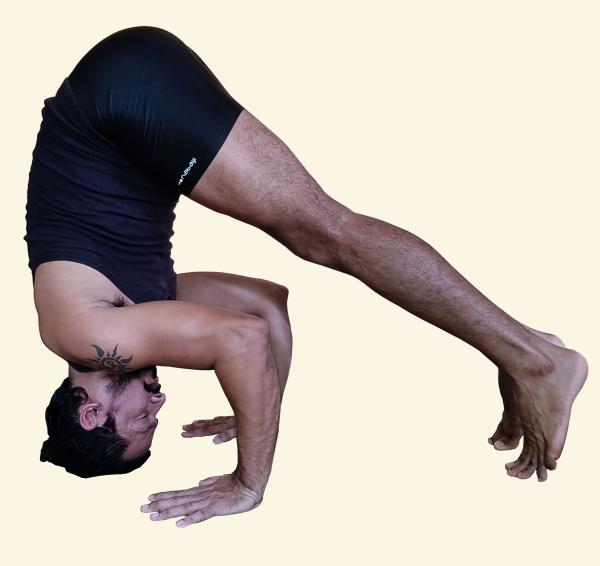
- Shifting more weight on the neck and the arms– The next progression would be to lift your knee up and walk a bit forward so that the body is almost vertical to the floor, here you will feel more load on the neck so engage the muscles appropriately as explained in above progression to counter it.

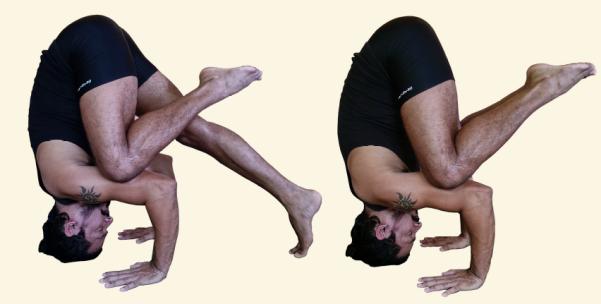
- Balancing in the half tripod headstand position – Walk your foot a little to find a point balance in which the upper body will be almost vertical to the ground. If you are confident here then slowly bend one knee and place the knee on the outside of the corresponding upper arm (see photo below). Alternate with the other knee. when you are confident here work on keeping both the knee on the outside of the corresponding upper arms. Keep practicing this position until you find yourself confident enough to try the next progression.

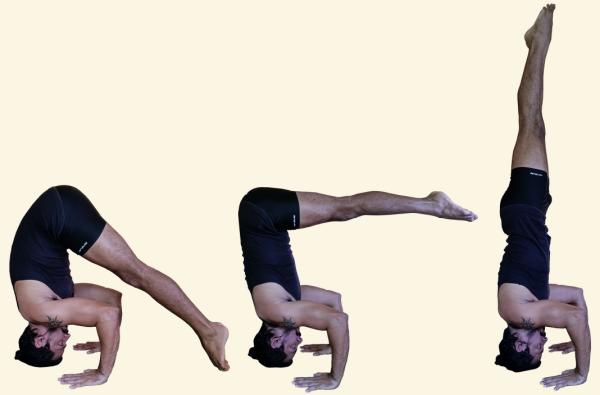
- Full tripod headstand – From the above position slowly work on straightening the legs, remember to keep the muscles engaged properly as mentioned above. Once straight work on pointing the toes and engaging the core in such a way that the body is completely rigid like a staff.

**Always practice under the guidance of a competent instructor, Practice near a wall until you gain more confidence.
There is another way to get into the pose which requires a bit more hips and hamstrings flexibility. In this way, you keep the legs straight at all times (see the transition below)

The Benefits and contradictions of this pose are the same as Salamba Sirshasana 1 (the common headstand)
Here we would like to explain one very important aspect (benefit) of the Yoga inversions, their effect on the lymphatic system. The lymph system is a subset of our circulatory system and plays a major role in the body’s immune system.
Yoga asana and Lymphatic Congestion
Yoga twists, inversions, and vigorous flow practices get the lymph moving again, and that alone can help restore your overall health.
Unlike the circulatory system, which relies on a pump (the heart) to push blood through the arteries, the lymphatic system relies on the intrinsic muscle contractions of the lymph channel walls and, to a greater degree, on large muscle activity in the body. The rhythmical tensing and relaxing of the muscles during physical movement wring out the tissues and force interstitial fluid into the lymph channels. One-way valves in the channels prevent gravity from pulling the lymph back into the limbs.
Any type of muscular contraction helps move lymph along, but yoga, with its emphasis on working every part of us, is especially effective. Yoga‘s attention to the breath and to the solar plexus region further distinguishes it from other forms of exercise. A lymphatic pump in itself, conscious breathing (pranayama) can help direct lymph through the deep channels of the chest.
Yoga works in three other ways to increase the flow of lymph and relieve lymphatic congestion: Inversions, like legs up the wall or shoulder stand, reverse the effect of gravity and drain lymph and used blood from the legs; working the abdomen with twists (as well as forward, backward, and side bends) stimulates the flow of lymph up through the core of the body by squeezing the organs and muscles and then allowing fresh fluid to soak back in as the twist is relaxed; and finally, like any aerobic exercise, dynamic flow practices cause large muscles in the body to contract and relax—the primary way lymph moves through the body.
Check the links below to know about the other types of headstands.