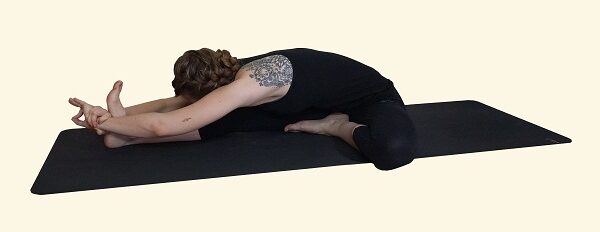
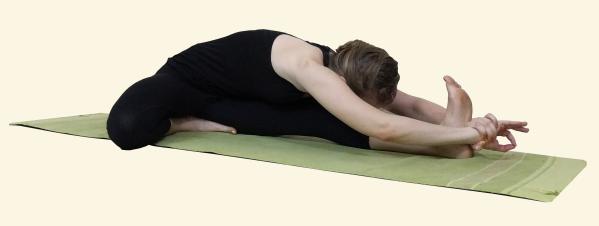
Janu-knee, sirsh-head, asana-pose; Head to knee pose.
The major focus of this pose is in two places, the hamstrings of the leg which is extended, and the groin (inner thighs, hips) for the bent leg. This posture is awesome for finding out imbalances in our body as you are working on one side at a time.
The hamstrings are a major muscle group that is used while performing a lot of daily activities (walking, running, jumping, lifting things up, etc). Hamstrings and hips can easily get tight, so adding this pose to your workout/asana/exercise sessions will make sure that you have a proper range of motion in your hips and a healthy joint.
For many people, the hamstrings are both weak and tight. Extreme tightness in the area will affect the posture of the whole body as well as put a strain on other joints. While doing a forward bend the whole posterior chain muscles (calves, hamstrings, glutes, back muscles, erector spinae) are required. If one area is weak or tight or both then the weight will be transferred to the other area which might get injured because of extra strain. This is the reason many people get injured while lifting heavy things. Reasons could be poor hip or hamstring flexibility which might round the back and put more strain on it.
“A chain is as strong as it weakest link“
While the hamstring stretch is definitely something you can use this posture for it is not the primary focus for the final version. The name of the posture specifically mentions the knee and head so we are looking for that circuit to be created for the energetic movement in the body. You can also use this pose to work on the calf flexibility if you make sure you flex the toes and the foot of your extended leg back towards your body.
Finally the bent leg. This is the one that changes position for the A, B, and C variations. To start with you may not be able to bend forward at all if the hip is too blocked to comfortably allow the knee down to the ground. Through slow progression, janu-sirshasana will allow you to open the hip and groin.
Always be careful of the knee joint and the back in this pose. You must remain conscious of your own limitations and not use excessive force to push the knee down or bring the body forwards as this may put undue pressure on vulnerable areas of the body. The way to protect the back is to move forward from your hips keeping the chest open until you can lie on the extended leg. Only AFTER you have enough flexibility to do that should you try to curve the back. This may take some months!
The B and C version works on the same elements as A but each has its own extra layer of functionality.
The B variation of this pose starts to work more on the energetic’s of the pose. In version B you sit on your heel, with it pressing into the root chakra. This helps to bring more awareness and helps to engage the root lock and brings stagnant energy upwards.
The C variation is a bit more advanced, and you must be very aware of keeping the knee and ankle protected. Please do not force this pose. In this version, you rotate the foot and the heel will press into the lower abdomen as you fold forward. This can put too much tension on the ligaments of the knee if there is any tightness in the hips in this direction. This posture is specifically working on the digestion, physical and emotional, and the energetic fire of the body.
Janu Sirshasana A Steps

- Sit with legs outstretched and the feet together (Dandasana).
- Bend the right leg and place the sole of your foot on the left inner thigh bringing the heel as close as possible to the groin, and send the knee towards the ground.
- Keep both hips squared to the front.
- Inhale straighten the spine, open the chest, and reach forward to hold the left foot or leg (depending on your flexibility).
- Exhale fold forwards from your hips, only moving as far as you can while keeping the spine straight and the chest and shoulders open.
- Breathe deeply, with every exhale reach further forward with the chest, keeping the shoulders down away from the ears. Stay in the posture for a few breaths.
- Inhale keeping the spine long lift the body up
- Exhale release the right leg, then repeat on the left side.
Janu sirshasana B Steps

- From a seated position inhale bend the right knee bringing the heel close to the groin and straightening the spine.
- Use the hands to lift the body, and come forward to sit on your heel, keep the toes pointing forward. (Initially, you may need to have the toes underneath the left leg due to flexibility restrictions)
- The heel should be pressing into the root chakra area (between the genitals and anus), and strongly engaging the root lock by contracting the muscles in the pelvic floor.
- Exhale send the chest forward over the extended leg.
- Breathe deeply keeping the spine as straight as possible and stay for a few breaths.
- Inhale keep the spine long, and lift the body up.
- Exhale lift the body off the heel and extend the right leg.
- Repeat on the left side
Janu sirshasana C Steps

CAUTION KNEE AND ANKLE, DO NOT FORCE THIS POSE!
- Bend the right knee, bring the right hand from underneath the shin to hold onto the inside of the right foot, and the left hand to the right heel.
- Rotate the foot so that the toes are pressing into the ground and the heel is up (you may only be able to get the little toe to touch at first if this is the case stay here for the pose and don’t bend forward)
- Once your toes are all pressing into the ground, let go of the right foot and bring the knee to the floor.
- Inhale reach forward to the left foot and straighten the spine.
- Exhale fold forward, the right heel should press firmly into the abdomen.
- Breathe deeply and stay for a few breaths.
- Inhale lift the body up with a straight spine
- Exhale using the hands carefully release the foot and straighten the right knee
- Repeat on the left side.
Alignment Tips
- If you feel that you cannot bend forward without curving your back, stay in the upright position.
- Always fold forward keeping the spine as straight as possible, to reduce pressure in the lower back. Think about the direction and purpose of the pose rather than what you want it to look like
- If you find one side is more flexible than the other, you can stay on the tighter side a bit longer.
- If you feel pain in your knee you need to change your alignment.
- Progress slowly and with awareness of your own limitations
Benefits:
- Opens the hips and groin, which helps to make all seated meditation poses more comfortable.
- Stretches the hamstrings and because it works on one side at a time it can help you get deeper than those postures which work on both legs at the same time (eg seated forward bend, standing forward bend).
- Helps to balance out differences between the left and right sides.
- Helps to release frustration and emotions that can be held in the back of the legs.
- Helps prepare for baddha-konasana
- B version helps to understand the root lock and importance of the pelvic floor while shifting energy upwards
- C version will improve digestion by pressing the heel into the abdominal organs increasing the blood flow there.
Contraindications:
- Back problems. If you have Slipped disc, sciatica, or herniated disc, stay upright, only working on the hip flexibility of the bent leg.
- If you have any knee injuries you can place a block or a pillow under the knee to lift it off the ground, or roll a small towel and place it behind the knee before bending to create space in the joint
- If you feel pain in the joints in this posture then come out and work on each element separately.
We have poured a lot of our experience, time, and effort into creating this website so that we can bring information to as many people as possible. We would greatly appreciate it if you could share this page if you found it useful.