Hatha Yoga Surya Namaskar – Sun Salutation
Download full size Surya Namaskar PDF version
Surya Namaskar – Sun Salutation
An ancient yogic tradition of worshiping the rising or setting of the sun (surya). It is thought that if the day and night were like breathing dawn and dusk would be the pause between the inhalation and exhalation (kumbaka) and the perfect time for reflection, meditation, or yoga practice.
The sequence can be used in preparation for other postures heating up and stretching the body, bringing the connection between movement and breath. It can also be used as a complete exercise in itself. It tones and stretches the muscles, massages the inner organs, and helps to relieve constipation, speeds up the metabolism and helps to reduce weight.
So even spending 15 minutes of your day practicing the Sun Salutations can be used to calm the mind, and promote health and balance.
Combine the different sequences for variation, and see how good they can make you feel.
Surya Namaskar Hatha Yoga
Unlike the Ashtanga sequences, the exact origins of this sequence are still somewhat of a debate. With some claiming that sun worship started in vedic times, and was combined with offerings to the sun, and others believing that Sun Salutation was invented by the Raja (king) of Aundh (a former state in India) in the early 20th century.
This sequence of movements or asanas can be practiced on varying levels of awareness, ranging from that of physical exercise, with the aims of physical health and well being. To a consciousness practice incorporating asanas (posture), pranayama (breathing techniques), mantra (chanting), and meditation, to bring mental well being and a state of balance between the body and the mind.
Whatever your motives for practicing, it’s certainly a positive way to start, or end your day.
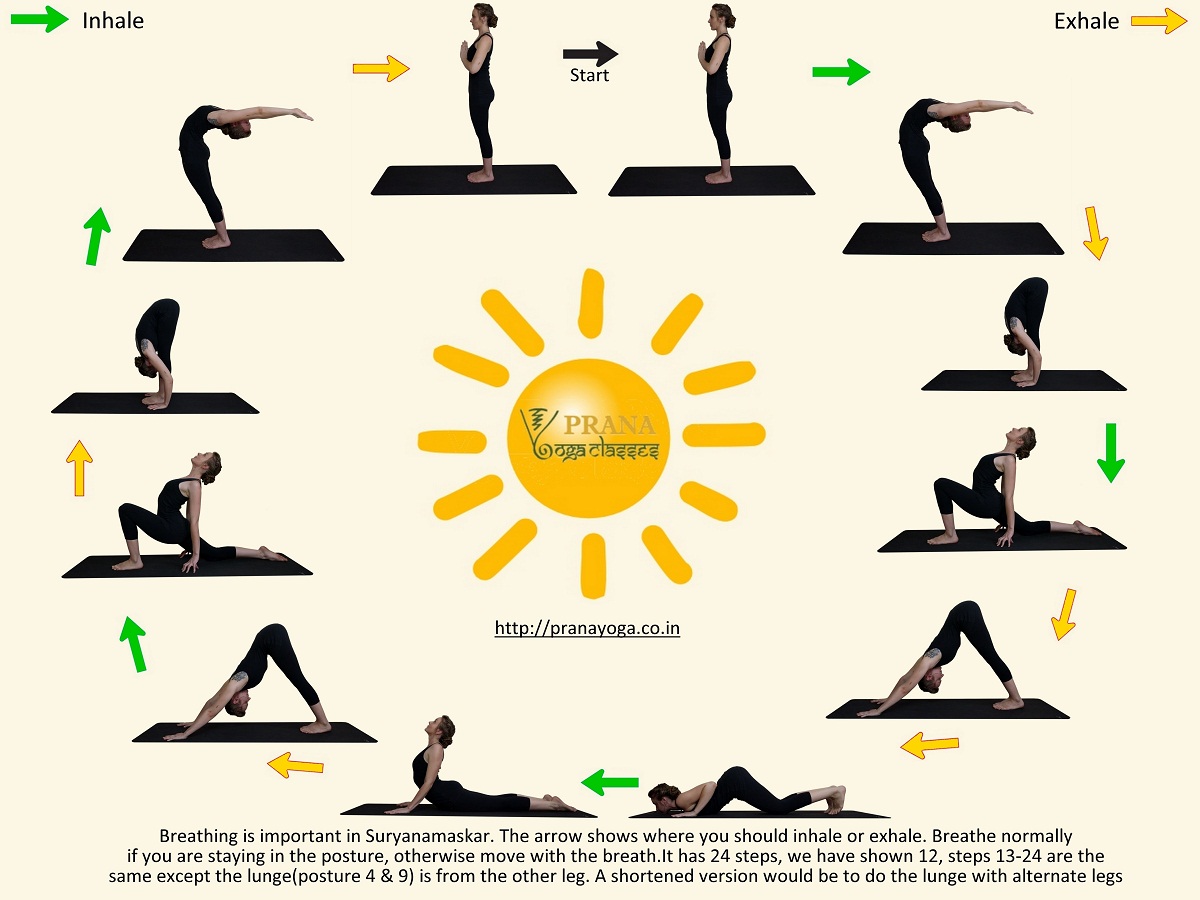
This variation of Surya Namaskar has 24 steps as described below.
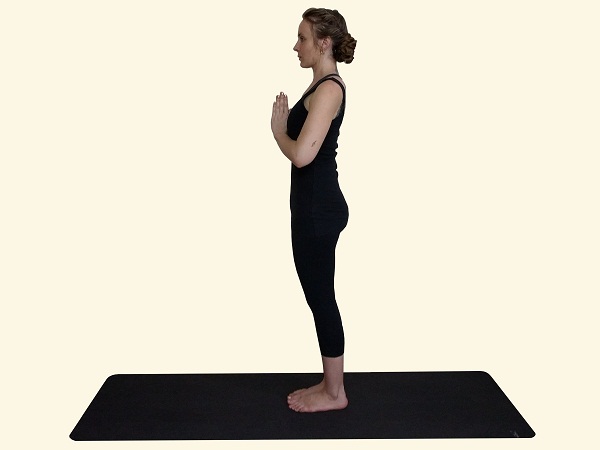
1. PRANAMASANA
Keep the eyes closed. Stand upright with the feet together. Bring the palms to meet in the center of your chest. Relax the whole body
Modify:
If you have lower back problems, or if your knees/thighs are rubbing together bring your feel parallel hip width apart.
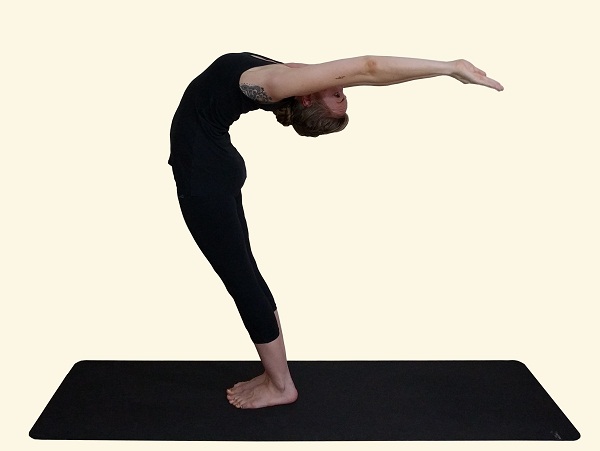
2. Inhale – HASTA UTTANASANA
Bring the hands shoulder width apart, bring them up over the head, and reaching back. You should bend the back slightly
Modify:
Hand straight up instead of back
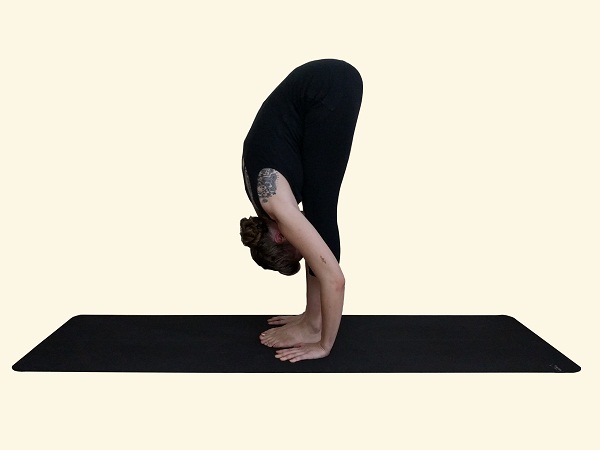
3. Exhale – UTANASANA
Bend forwards from the hips until the finger or palms of the hands touch the floor on either side of the feet. Do not strain
Modify:
.If you have slipped disc or lower back problems keep the knees bent so that the palms come to the floor.
.Bring the hands onto the shins/ankle until you have enough flexibility to reach the floor
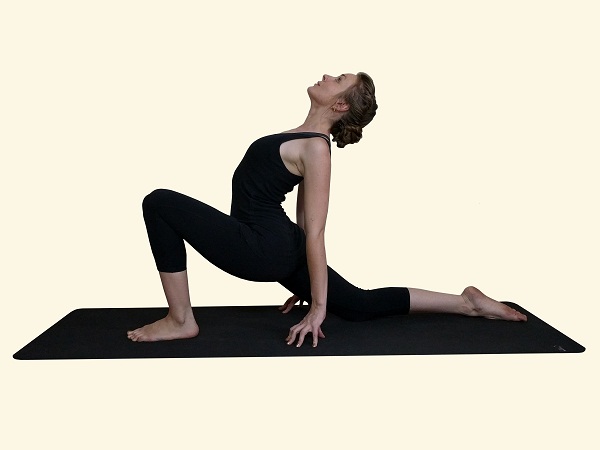
4. Inhale – ASHWA SANCHALANASANA
Stretch the right leg back as far as is comfortable tucking the toes under. At the same time bending the left knee leaving the foot flat on the floor. Arch the back and gaze up to the sky
Modify:
bring the back knee onto the floor
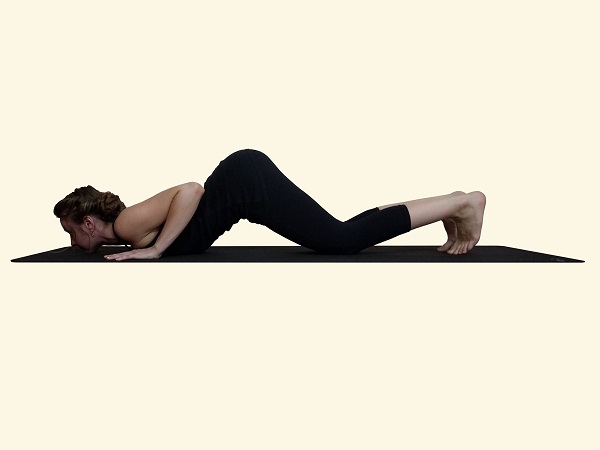
5. Exhale – PARVATASANA/MOUNTAIN POSE
Bring the palms onto the floor and stepping the left foot back beside the right, while lifting the hips up into the air. Lengthening through the spine, bringing the shoulders towards the ankles. Take a few breaths. (This posture is similar to Downward facing dog, except the feet are together)
Modify:
Keep the knees slightly bent if the posture is too intense.

6. On the next Exhale – ASHTANGA NAMASKARA
Coming onto your toes, simultaneously lower the knees, chin, and chest to the floor. The hips and abdomen remain raised.
Modify:
Lower the knees first then the chest and chin
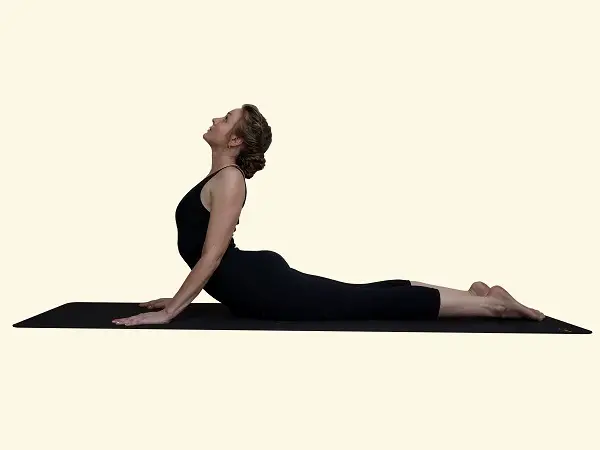
7. Inhale – BHUJANGASANA
Keeping the hands and feet in place, slide the chest forward and raise the chest up. Opening the shoulders (pulling them away from the ears) and tilting the head back to look at the sky. The hips and thigh should be on the floor.
Note:
Keep the buttocks and thighs engaged (squeezed) to prevent problems in the lower back. Unless you are very flexible dont try to straighten your arms
8. Exhale – PARVATASANA/MOUNTAIN POSE
Keeping the hands and feet in the same position lift the hips up, bringing the heels to the ground, lengthening through the spine, bringing the shoulders towards the ankles. Take a few breaths here. As you exhale lifting the hips towards the sky and pressing the hands into the ground. (Same as step 5)
9. Inhale – ASHWA SANCHALANASANA
Bring the left foot forwards between the hands, and push the pelvis forwards. Lift the torso and tilt the head back, arching the back and looking up to the sky (Same as step 4)
10. Exhale – UTANASANA
Bring the right foot next to to the left, and straighten the knees. Bring the crown of the head towards the floor. (Same as step 3)
11. Inhale – HASTA UTANASANA
Keeping the arms shoulder width apart, raise the torso with spine as straight as possible. Bring the hands up over the head, and reaching back, bending slightly. (Same as step 2)
12. Exhale – PRANAMASANA
Bring the palms together in front of the chest center. (Same as step 1)
Repeat the cycle reversing the legs in Steps 4 and 9 (Ashwa Sanchalanasana), to stretch the other side. Rest all the Postures will be the same.